How to Turn a Closet Into a Wine Cellar: The Professional Guide

*Pictures are renderings. Actual wine racks may look different
Transform any standard closet into a professional-grade, climate-controlled wine cellar with this comprehensive design and engineering guide. An underutilized closet holds the potential to become a stunning and perfectly functional home for your growing wine collection, moving you beyond a simple wine fridge into the world of true, long-term preservation. However, success hinges on understanding a critical concept: a closet wine cellar is not just a room with racks. It is a specialized, sealed climate pressure vessel, and its performance depends on the invisible infrastructure built behind the walls.
This guide will walk you through the professional methodology for converting a closet, addressing common fears like mold and moisture damage, confusion over cooling units, and the challenge of limited space. We will elevate you from a DIY-er to an informed project manager, giving you the technical authority to ask the right questions and a clear path to creating a functional, beautiful wine cellar that protects your investment and increases your home's value.
Assessing Your Closet for Wine Storage Potential
Before any demolition begins, a thorough assessment of your chosen closet is the essential first step. Not all closets are created equal, and selecting the right location will save you significant time, expense, and potential heartache. The ideal space provides a stable foundation for the climate-controlled environment you intend to build.
- Identifying the ideal location: Interior closets are far superior to those on exterior walls. They are naturally buffered from drastic outdoor temperature swings and direct sunlight, reducing the workload on your cooling unit and creating a more stable environment.
- Measuring for maximum bottle density and airflow clearance: Carefully measure the closet's interior length, width, and height. These dimensions will determine your maximum bottle capacity and, just as importantly, dictate the type of cooling unit and racking that will fit while allowing for proper air circulation.
- Electrical requirements: A dedicated, non-GFI circuit is typically required for a wine cellar cooling unit. Consult with a licensed electrician early in the process to determine if you have an available circuit or if a new one needs to be run to the closet location.
- Floor load considerations: Wine is heavy. A collection of 200 bottles, plus robust racking, can weigh over 1,000 pounds. Ensure the floor structure beneath your closet, especially if it's on an upper level, can support the total calculated weight.
Location and Ambient Environment
The immediate surroundings of your closet play a crucial role in the cellar's long-term success. Wine is sensitive to its environment, and the goal is to create a sanctuary free from harmful external influences.
- Why avoiding sunlight and vibration is critical for long-term aging: UV rays from sunlight can degrade wine, causing premature aging and "light strike" faults. Constant vibrations from appliances like washing machines, dryers, or home theater systems can disturb the sediment in aging bottles and negatively impact their chemical maturation.
- Assessing the 'heat load' of the surrounding rooms: A closet sharing a wall with a furnace room, a laundry room, or a sun-drenched living room will have a higher ambient temperature. This "heat load" forces the cooling unit to work harder, increasing energy costs and potential wear.
- The impact of flooring types on insulation and bottle safety: Concrete slab floors offer excellent thermal mass and stability. Wood-framed floors may require additional structural support and will be a key area to address during the insulation and vapor barrier phase.
The ideal closet is one with minimal temperature fluctuation and no shared walls with heat-generating kitchen appliances or high-vibration utility areas.
Utility and Access Planning
Practical considerations for how the cellar will function day-to-day are just as important as the construction itself. Planning for utilities and your own access patterns will ensure the finished space is both efficient and enjoyable to use.
- Planning for condensate drainage in self-contained cooling units: Most cooling units produce condensation as they operate. Self-contained "through-the-wall" units require a plan for this moisture. This often involves a condensate drain line running to a nearby sink, floor drain, or a small pump system.
- Ensuring adequate door swing and 'tasting space' within the footprint: A cellar door must open smoothly without being obstructed. Consider whether an out-swing door is more practical than an in-swing door, which can eat into valuable racking space. Even a small landing area outside the closet can serve as a functional "tasting space" for selecting bottles.
Building the Climate Envelope: Insulation and Vapor Barriers
This is the most critical construction phase and the one most often overlooked in generic DIY guides. To maintain a constant 55°F and 50-70% humidity, your closet must be transformed into a completely sealed room—an envelope. This is achieved with a combination of a vapor barrier and high-performance insulation.
- The science of the vapor barrier: A vapor barrier is a sheet of 6-mil plastic that prevents warm, moist air from the rest of your home from infiltrating the cold cellar walls. When warm air meets a cold surface, it creates condensation. Without a vapor barrier, this condensation would form inside your walls, leading to destructive mold, mildew, and rot.
- Choosing insulation materials: Closed-cell spray foam is the gold standard for wine cellars. It acts as both insulation and a vapor barrier in one application, creating a perfect, monolithic seal. Rigid foam boards are a viable alternative, but every seam and penetration must be meticulously sealed with moisture-resistant tape. Standard fiberglass batt insulation is not recommended as it can absorb moisture and lose its insulating properties.
- Achieving the correct R-value (R-19 to R-30): The "R-value" measures an insulation's ability to resist heat flow. For walls and ceilings in a wine cellar, a minimum of R-19 is recommended, with R-30 being ideal for maximum thermal efficiency.
- Sealing the envelope: The final piece of the puzzle is the door. A standard interior hollow-core door offers virtually no insulation and will leak air. A cellar-grade, exterior-rated door with weatherstripping and a bottom sweep is non-negotiable to complete the seal.
Vapor Barrier Installation Step-by-Step
If you are not using closed-cell spray foam, the proper installation of a plastic vapor barrier is paramount. It must be placed on the "warm side" of the insulation—meaning on the exterior of the cellar studs, just behind the drywall of the surrounding rooms.
- Apply 6-mil plastic sheeting to the walls and ceiling on the warm side of the framing. This means it will be between the studs and the exterior drywall.
- Overlap all seams by at least 6-12 inches to ensure there are no gaps where moisture can penetrate.
- Seal every seam, staple, and penetration with a high-quality construction tape designed for vapor barriers. Pay special attention to areas where electrical wiring or cooling unit lines pass through.
Selecting High-Performance Insulation
Your choice of insulation directly impacts your cooling unit's efficiency and the stability of your cellar's climate. The goal is to eliminate any and all air gaps.
- Pros and cons of polyurethane spray foam for small closet spaces: For a small, enclosed space like a closet, the superior sealing power of closed-cell spray foam is a significant advantage. It expands to fill every crack and crevice, providing the highest R-value per inch and creating an impermeable air and moisture barrier. While the initial cost is higher than rigid foam, it often saves money over time through energy efficiency.
- Ensuring zero air gaps to maintain a consistent 55-degree environment: Any gap in the insulation is a weak point where heat can enter and cold can escape. This thermal bridging forces your cooling unit to run more frequently, leading to temperature fluctuations and higher energy bills. Whether using spray foam or rigid boards, the installation must be airtight.
For a deeper dive into the principles of cellar construction, explore our professional resources on custom wine cellar design.
Selecting the Right Cooling Unit for Small Spaces
The cooling unit is the heart of your wine cellar. It does more than just chill the air; it maintains the precise temperature and humidity required for graceful aging. Unlike a standard air conditioner, a wine cellar cooling unit is engineered to run gently, remove a limited amount of moisture, and hold a consistent temperature.
- Sizing your unit: The biggest mistake in cellar design is choosing an oversized cooling unit. A unit that is too powerful will cool the space too quickly and shut off—a process called "short-cycling." This prevents it from running long enough to manage humidity properly, resulting in a cold but dangerously dry environment. Sizing is based on the closet's cubic footage, insulation R-values, and ambient heat load.
- Self-contained vs. Split systems: The two primary options for a closet are self-contained "through-the-wall" units and ductless split systems. Your choice will depend on your home's layout, your budget, and your tolerance for noise.
- Top cooling brands for residential closets: We partner with industry-leading brands like WhisperKOOL, Wine Guardian, and CellarPro, which all offer compact, efficient models specifically designed for cabinets and small cellars.
- Managing humidity: Proper humidity prevents corks from drying out, which would allow oxygen to seep in and spoil the wine. Wine cellar cooling units are designed to maintain that 50-70% humidity range, a critical difference from standard AC units which are built to dehumidify a space.
Self-Contained Through-the-Wall Units
These all-in-one units are the most straightforward and cost-effective option for many closet conversions. The entire unit mounts through the wall, with the cold side facing the cellar and the exhaust side venting into an adjacent space.
- Ease of installation: Often called "plug and play," these systems are relatively easy for a contractor or skilled homeowner to install. They require a framed opening in the wall but typically do not require an HVAC specialist.
- Venting requirements: The hot air exhaust must be vented to a space that is at least as large as the cellar itself and has good air circulation, such as a utility room, garage, or unfinished basement area. Venting into a hallway or another small, finished room is not recommended.
Explore a complete range of options in our collection of wine cellar cooling systems.
Ductless Split Systems for Quiet Operation
A split system separates the evaporator (the cold side) from the condensing unit (the noisy, heat-producing side). The quiet evaporator is mounted inside the cellar, while the condenser is located elsewhere—in a utility room, attic, or even outside the home.
- Moving the compressor noise outside the closet area: This is the primary advantage. By relocating the loudest components, a split system ensures your cellar and the surrounding living space remain whisper-quiet.
- The aesthetic benefit of minimal interior hardware: The evaporator unit inside the cellar is typically sleek and unobtrusive, preserving the clean lines and visual appeal of your racking and wine display.
We often recommend WhisperKOOL split systems for closets where venting a self-contained unit to an adjacent room is not feasible or desirable.

Maximizing Bottle Capacity with Custom Racking Systems
With the infrastructure complete, you can now focus on the most visually rewarding element: the wine racks. In a small closet, every inch matters. The goal is to balance high-density storage for your collection with display elements that showcase your most prized bottles.
- Traditional Wood Racking: For a classic, timeless aesthetic, modular wood systems like our Vintner and Carpenter series are ideal. They can be configured to fit any space, offering a warm, inviting look that has defined wine cellars for centuries.
- Modern Metal Solutions: For a contemporary or transitional feel, metal racking systems create a stunning visual effect. Fusion Wine Walls, Cable Racks, and Wine Pegs make bottles appear to float, turning your collection into a work of art.
- High-density storage: To maximize capacity in a narrow space, consider double-deep racking, which stores one bottle behind another. Diamond bins and case storage are perfect for bulk storage of your favorite everyday wines.
- Displaying your best: Incorporate high-reveal display rows, which pitch bottles at a 15-degree angle to show off the labels. Integrated, low-heat LED lighting can be used to create dramatic accent points without harming the wine.
Wood Racking Collections
Wood brings a natural warmth and elegance to a cellar. The choice of material is important, as it must withstand the cool, humid environment for decades without warping or degrading.
- The timeless appeal of the Classic Series for residential closets offers a custom-milled look with robust construction, perfect for creating a sophisticated, library-like feel.
- Why redwood and white oak are preferred for high-humidity environments. These woods possess natural properties that make them resistant to mold and mildew, ensuring the structural integrity and beauty of your racks for the life of your collection.
Discover the possibilities in our full catalog of wooden wine racks.
Contemporary Metal and Glass Options
Metal racking systems offer incredible design flexibility and are perfect for minimalist or modern aesthetics. They excel at maximizing vertical space and creating an open, airy feeling even in a small closet.
- Using the Wine Peg series to create a floating bottle effect against a custom-finished backer wall. This label-forward orientation makes it easy to identify and select bottles.
- Maximizing vertical space with floor-to-ceiling metal frames. These systems provide excellent structural support while maintaining a light, unobtrusive profile that keeps the focus on the wine.
See how these systems can transform a space by viewing our modern metal wine rack solutions.
Finalizing the Design and Professional Execution
The final stage is about bringing all the technical and aesthetic elements together into a cohesive, functional plan. This is where professional guidance can prevent costly mistakes and ensure the finished product meets your expectations.
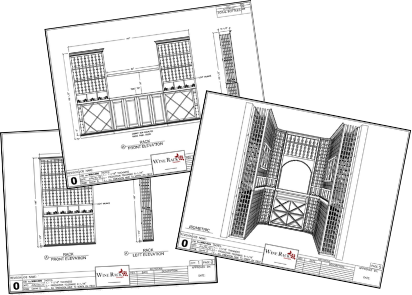
- The importance of a professional CAD design before swinging a hammer: A detailed design plan allows you to visualize the final layout, confirm bottle capacity, and ensure that racking, lighting, and the cooling unit all fit together perfectly.
- Selecting a cellar-grade door: As mentioned, this is a critical component. A standard interior door will compromise the entire climate envelope. An exterior-grade, insulated door with a solid core and excellent weatherstripping is essential.
- Final finishing: Low- or no-VOC paint or stain should be used on any interior surfaces to prevent chemical odors from affecting your wine. Flooring should be durable and moisture-resistant, such as tile, sealed concrete, or vinyl.
- The Wine Rack Concepts approach to collaborative design: We believe the best cellars are born from a partnership between your vision and our technical expertise. We work with you to translate your ideas into a buildable, high-performance design.
Cellar Doors and Sealing
The door is your only moving part and the most likely point of failure in a poorly planned cellar. Investing in a quality door is investing in the protection of your collection.
- The role of exterior-grade metal doors with glass in maintaining the seal. Our American-made metal doors are designed for cellar use, featuring dual-pane, argon-filled glass and robust insulation to prevent heat transfer.
- Why an automatic bottom seal is the 'secret weapon' of closet cellars. This device is mortised into the bottom of the door and automatically drops down to create a perfect seal against the threshold when the door is closed, eliminating the common air gap at the floor.
You can learn more by exploring professional custom wine storage solutions for collections of all sizes.
The Free Design Process
The most confident way to begin your closet conversion project is with a professional plan in hand. Our complimentary design service removes the guesswork and provides you with a clear roadmap for success.
- How to provide your closet dimensions for a custom layout: Simply measure your space and send us the dimensions, along with any photos and your general ideas for style and capacity.
- Reviewing 3D renderings to visualize your finished cellar: Our designers will create a complete set of CAD drawings, including 3D renderings, that show you exactly how your finished cellar will look and function. This allows you to make adjustments before any materials are ordered or construction begins.
A properly designed closet wine cellar is an achievable and highly rewarding home improvement project. By focusing on the critical infrastructure of the climate envelope and partnering with experts for the design phase, you can create a space that will protect and showcase your wine collection for years to come.
Request Your Free Custom Closet Wine Cellar Design
Frequently Asked Questions
Do I really need a cooling unit for a small closet wine cellar?
Yes. To properly age wine, you must maintain a consistent temperature (around 55°F) and humidity level. A passive cellar can only achieve this in very specific subterranean environments. For a closet in a typical home, a dedicated wine cooling unit is the only way to create the stable conditions necessary to protect your wine from heat damage and oxidation.
What is the best insulation for a wine cellar closet?
Closed-cell polyurethane spray foam is considered the best all-in-one solution because it provides a high R-value per inch and acts as its own seamless vapor barrier. If spray foam isn't an option, multiple layers of rigid foam board insulation with all seams meticulously taped is the next best choice.
How much does it cost to turn a closet into a wine cellar?
The cost can vary widely based on size, materials, and the complexity of the cooling system. A small DIY conversion might start at a few thousand dollars, while a professionally designed and installed closet with high-end racking and a split cooling system can be significantly more. The key components of the budget are framing/drywall, the vapor barrier, insulation, the cooling unit, a cellar-grade door, and the racking.
Can I use a standard refrigerator or air conditioner for my wine closet?
No. A standard refrigerator is too cold and creates an environment that is far too dry, which will ruin your wine corks. A standard air conditioner is designed to cool a space and remove humidity, the opposite of what a wine cellar needs. They also cannot maintain the precise, consistent temperature required for aging.
How many bottles can I fit in a standard 5-foot closet?
Capacity depends on the depth of the closet and the style of racking. A typical 5' wide by 2' deep reach-in closet, when properly racked, can often hold between 150 and 250 bottles. Using high-density options like double-deep racking or diamond bins can increase this number.
What kind of door should I use for my wine cellar?
You must use an exterior-grade, insulated door with a solid core and full weatherstripping. It needs to create a complete seal to prevent the cold, conditioned air from escaping. A hollow-core interior door will not work and will cause your cooling unit to run constantly.
Do I need a vapor barrier if my closet is in the basement?
Yes, absolutely. Even in a naturally cool basement, the temperature difference between your 55°F cellar and the ambient basement air is enough to cause condensation within the walls if a proper vapor barrier is not installed on the warm (basement) side of the cellar framing.
How do I manage humidity in such a small storage space?
Humidity is managed primarily by your wine cooling unit. These specialized units are designed to maintain a humidity level of 50-70%. Some advanced models have built-in humidifiers for very dry climates, but in most cases, a properly sized unit running in a well-sealed room will maintain the ideal humidity naturally.
Have an expert help today!
Free 2D wine cellar design