How to Build a Wine Cellar in Your Basement: A Professional Construction Guide

*Pictures are renderings. Actual wine racks may look different
A basement wine cellar is more than just a storage room; it's a high-performance machine where the integrity of the airtight seal determines your collection's survival. If you're researching how to build a wine cellar in your basement, you likely know that this below-grade space offers a natural advantage for temperature stability. However, without the right technical foundation, that same underground environment can quickly become a breeding ground for mold and moisture. It is a delicate balance of physics and design that requires a specialized approach to construction.
You want a sanctuary that preserves your investment while adding sophisticated value to your home. We understand the hesitation that comes with choosing the right insulation or worrying about which cooling unit will maintain that perfect 55-degree environment. This guide provides the professional blueprint you need to master these requirements with confidence. We'll walk through the essential steps of creating a vapor barrier, selecting specialized refrigeration, and choosing durable racking systems to transform your square footage into a professional-grade display.
Key Takeaways
- Identify the ideal "Goldilocks Zone" within your home to maintain a consistent 55-58°F environment and 60-70% humidity for long-term aging.
- Learn the professional methods of how to build a wine cellar in your basement by creating an airtight envelope with a 6-mil poly vapor barrier and high-R-value insulation.
- Determine the correct cooling system for your specific layout, whether you require a self-contained refrigeration unit or a ducted split system.
- Maximize your storage density and aesthetic appeal by selecting moisture-resistant hardwoods and modular racking like the Vintner Series.
- Ensure a permanent climate seal by installing specialized metal wine cellar doors and protecting your collection with UV-free LED lighting.
Evaluating Your Basement for Professional Wine Storage
Transforming a subterranean space into a professional sanctuary begins with a cold, hard assessment of the existing environment. While many homeowners assume their lower level is naturally suited for storage, understanding how to build a wine cellar in your basement requires moving beyond guesswork. You must target the "Goldilocks Zone" for maturation: a consistent temperature between 55-58°F and a relative humidity level of 60-70%. Achieving this range isn't just about comfort; it's about the chemical preservation of every cork and vintage in your care.
Success starts in the coolest, darkest corner of the floor plan. Avoid placing your cellar near mechanical rooms, furnaces, or laundry suites, as these areas generate heat and constant vibrations that can agitate sediment. Before you commit to a layout, measure your ceiling heights and check the levelness of the floor. Even a slight slope can complicate the installation of precision-engineered racking. Additionally, assess your electrical panel. Professional cooling units require dedicated circuits to ensure they operate without interruption, protecting your collection from the seasonal temperature spikes that often plague unconditioned basements.
The Science of Basement Wine Aging
Concrete walls provide excellent thermal mass, helping to maintain a steady temperature, but they are notoriously poor insulators. Without a proper thermal break, heat will eventually migrate through the stone. Beyond temperature, you must protect your bottles from UV light, which can degrade organic compounds and lead to "light-struck" flavors. Even subtle, constant vibrations from a nearby HVAC system can disrupt the delicate aging process. By isolating the cellar from these environmental stressors, you ensure the wine ages exactly as the winemaker intended.
Space Planning and Capacity Goals
Effective space planning balances your current inventory with your future aspirations. This is a crucial step in learning how to build a wine cellar in your basement that remains functional for decades. Standard single-deep racking typically holds 4-6 bottles per square foot of wall space, though this varies based on your design choices. If you prefer a mix of individual bottle display and bulk storage for cases, modular systems like the Vintner Series offer the flexibility to adapt as your collection grows. Planning for at least 20% more capacity than you currently need is a wise strategy for any dedicated enthusiast.
Building the Airtight Cellar Envelope
Creating a professional-grade storage space isn't about aesthetics alone; it's about engineering an airtight environment. When you research how to build a wine cellar in your basement, the technical term you'll encounter most is the "envelope." This is the hermetically sealed box that separates your collection from the fluctuating humidity of the rest of your home. Without this integrity, your cooling unit will work overtime, leading to premature mechanical failure and potential mold growth within your walls.
To start, every stud must be properly addressed. We recommend installing a 6-mil poly vapor barrier on the exterior, or "warm side," of the cellar walls. This prevents moisture from the basement's ambient air from migrating into your chilled space. If you're working against existing foundation walls, you must leave a small air gap between the concrete and your new cellar wall to prevent direct moisture transfer. Every penetration, from electrical outlets to light fixtures, must be sealed with canned foam or caulk to prevent air leaks that compromise the climate.
Insulation Standards and R-Values
Temperature stability depends on the thermal resistance of your materials. Industry standards dictate a minimum of R-19 insulation for the walls and R-30 for the ceiling. While fiberglass batts are a common choice, they can lose efficiency if they become damp. Rigid foam boards offer better moisture resistance, but closed-cell spray foam remains the premier choice. It expands to fill every crevice, eliminating "cold bridges" where heat might leak through the studs. Ensuring your ceiling is heavily insulated is vital, as this is where the most significant heat gain occurs in a basement setting.
Moisture Management and Vapor Barriers
Moisture is the primary enemy of any long-term aging project. A properly installed vapor barrier is your first line of defense against mold and structural rot. Beyond the walls, you must consider the floor; standard concrete is porous and allows humidity to escape or enter. Applying a high-quality concrete sealer or installing moisture-resistant flooring ensures your cooling system maintains the target 60-70% humidity without struggle. For the ultimate airtight finish, consider how Metal Wine Cellar Doors with magnetic gaskets can provide a commercial-grade seal that standard interior doors simply can't match.
Selecting a Wine Cellar Cooling System
While the subterranean nature of a basement provides a head start, relying on passive cooling is a gamble that rarely pays off in modern homes. Active climate control is the heart of the project. When you are learning how to build a wine cellar in your basement, selecting the right cooling system is the most critical technical decision you will make. You must calculate BTU requirements based on the room's total cubic volume, the quality of your insulation, and the amount of glass used in the design. A unit that is underpowered will run constantly and fail early; one that is overpowered will cycle too frequently, failing to remove humidity effectively.
Positioning is equally vital. The unit needs clear airflow to circulate chilled air to every bottle, and it must have a path to exhaust heat away from the cellar. Integrating a digital hygrometer allows for real-time monitoring of both temperature and humidity. This provides peace of mind that your collection remains in a stable environment. It is also a safeguard against the seasonal fluctuations that can occur even in the most well-insulated basement spaces.
Self-Contained Refrigeration Units
Self-contained refrigeration units are often the most practical choice for basement conversions. These systems house the evaporator and condenser in one housing, typically installed through an interior wall. They are efficient and straightforward to maintain, provided you have an adjacent room large enough to absorb the exhaust heat. This neighboring space should be at least twice the size of the cellar and well-ventilated to ensure the unit doesn't overheat. Regular filter cleanings and coil inspections will keep these workhorses running for years without interruption.
Advanced Climate Control Options
If your basement layout doesn't allow for through-the-wall exhaust, or if you prefer a whisper-quiet environment, advanced split or ducted systems are the solution. Split systems separate the quiet evaporator inside the cellar from the noisy condenser, which can be placed outdoors or in a remote utility room. These require professional HVAC installation but offer superior control. Regardless of the system type, always use a dedicated electrical circuit. This prevents the unit from tripping breakers when other appliances start up. In particularly dry regions, you may also need to integrate a humidification system to keep corks from drying out, ensuring the airtight seal of the bottle remains intact.
Designing the Interior with Professional Racking
Once the climate envelope is secure, the focus shifts to the furniture of the cellar. Choosing the right materials is a technical necessity rather than just a stylistic choice. Since your basement will maintain a high humidity level, you must select woods that naturally resist decay and warping. All-heart Redwood and Mahogany are industry standards because they don't require stains or sealants that might off-gas and potentially taint your wine through the cork. If you're dealing with the low ceilings or support pillars common in lower levels, utilizing custom wine racks allows you to maximize every inch of irregular basement dimensions while maintaining a seamless, built-in look.
Integrating the Vintner Series provides a traditional, high-density storage solution that feels like a classic estate cellar. This modular system is particularly effective because it allows you to stack and expand your storage as your collection grows, fitting perfectly into the specific height constraints of your space. Mastering how to build a wine cellar in your basement involves balancing these aesthetic choices with the practical needs of the wine. For those who prefer a contemporary edge, the Fusion Wine Wall offers a striking mix of wood and metal. This system creates a clean, architectural look while maintaining the structural integrity required for heavy collections.
Traditional vs. Modern Racking Styles
The Carpenter Series is ideal for enthusiasts seeking a hand-crafted, furniture-grade appearance that honors old-world traditions. Redwood is prized for its cool, earthy tones and its ability to withstand dampness without chemical treatments. If your floor space is limited, leveraging wall mounted wine racks can keep the center of the room open for movement or a tasting station. For a truly minimalist aesthetic, cable and glass systems create a "floating" bottle appearance, turning your collection into a transparent piece of modern art. Knowing how to build a wine cellar in your basement means selecting the style that best complements your home's architecture.
Maximizing Basement Storage Density
High-density storage is about variety and accessibility. While individual bottle cradling is best for airflow and label visibility, diamond bins are essential for bulk purchases and case storage. These bins allow you to stack identical vintages efficiently without wasting vertical space. It's also vital to plan for Champagne and Magnum-sized bottles. These larger formats require wider openings than standard 750ml slots. A well-planned layout ensures that your most impressive bottles have a dedicated home rather than being squeezed into corners where airflow might be restricted.
Final Installation: Doors, Lighting, and Sealing
The final stage of construction is where the technical precision of the envelope meets the aesthetic vision of your display. After the racking is installed, you must focus on the final micro-seals that protect your investment. Apply a high-grade silicone sealant to all baseboards, trim, and where the walls meet the ceiling. This ensures that the vapor barrier you established earlier isn't compromised by small air gaps. Once the room is fully sealed, calibrate your thermostat and allow the environment to stabilize for 48 hours before introducing your collection. This period allows the cooling unit to reach the target 55-degree mark and ensures the humidity levels remain constant without immediate stress on the system.
Completing this process correctly is the difference between a functional room and a professional-grade sanctuary. If you've followed the steps on how to build a wine cellar in your basement, you've already invested in high-quality insulation and racking. These final touches, particularly the door and lighting, are what preserve the longevity of your corks and the chemical stability of the wine itself. Every detail matters when you're managing a climate-controlled environment below grade.
The Importance of the Cellar Door
A cellar is only as strong as its weakest point, which is almost always the entryway. When homeowners look for how to build a wine cellar in your basement, they often mistakenly believe a standard exterior-grade door is sufficient. However, professional metal wine cellar doors are engineered specifically for the temperature differential between a 55-degree cellar and a 70-degree basement. These specialized doors feature a thermal break to prevent condensation and a magnetic gasket seal that works like a refrigerator door. An automatic bottom sweep is also essential; it creates an airtight threshold that prevents heavy, chilled air from leaking out across the floor every time the door is closed.
Lighting and Ambiance
Lighting should be both functional and protective. Traditional bulbs emit heat and UV rays that can cause "light-struck" wine, leading to unpleasant chemical changes in the bottle. Instead, select UV-free LED lighting. These fixtures stay cool and won't disrupt the temperature of your top-tier bottles. For modern designs like the Fusion series, LED puck lights or strip lighting can accentuate the metal and wood textures without risk. Integrating motion sensors or timers is a professional touch that ensures lights aren't left on accidentally. Finally, ensure your flooring, whether cork, sealed concrete, or stone, is rated to withstand the constant 60% humidity without warping or growing mold.
Your Vision of a Professional Sanctuary
Achieving a professional-grade result requires a meticulous blend of scientific precision and master craftsmanship. You now possess the blueprint for establishing a hermetic seal and selecting moisture-resistant materials that thrive in subterranean conditions. By prioritizing the climate envelope and choosing specialized refrigeration, you ensure your vintages mature in a stable, protected environment. Each technical choice you make today serves as a safeguard for your collection's future.
Mastering how to build a wine cellar in your basement is a significant investment in your home's value and your personal curation. Wine Rack Concepts, LLC provides the specialized metal doors, cooling units, and expert design consultations needed to bridge the gap between an initial concept and a finished, high-performance result. We balance design expertise with a global approach to sourcing high-quality materials, ensuring every component meets the rigorous demands of a climate-controlled environment. It's a journey that transforms an underutilized space into a centerpiece of pride.
Your collection deserves a storage environment that's as timeless and enduring as the wine itself. We look forward to helping you create a space where your passion for curation can truly flourish.
Frequently Asked Questions
Do I really need a cooling system if my basement feels cold?
Yes, you need a dedicated cooling system because ambient basement temperatures often fluctuate between 60 and 75 degrees depending on the season. While a basement feels naturally cool, it rarely maintains the constant 55-degree environment required for chemical stability. Passive storage lacks the precision to protect long-term investments. Active refrigeration ensures your collection remains at the "Goldilocks Zone" regardless of external weather patterns or home heating cycles.
How much does it cost to build a wine cellar in a basement?
The cost to build a wine cellar in your basement typically ranges from $300 to $600 per square foot for a professional installation. While a small DIY project might start around $3,000, a luxury walk-in cellar for over 500 bottles often requires a budget between $30,000 and $100,000. These figures account for specialized cooling units, high-R-value insulation, and moisture-resistant racking materials like Redwood or Mahogany.
Can I use a regular air conditioner for my wine cellar?
You cannot use a regular air conditioner because they are designed to remove humidity and typically only cool down to 68 degrees. Wine requires a much lower 55-degree temperature and a higher relative humidity of 60-70%. A standard AC unit will dry out your corks and cause them to shrink, eventually leading to oxidation. Dedicated wine cooling systems are engineered to maintain this specific moisture balance while protecting the room's airtight seal.
What is the best insulation for a basement wine cellar?
Closed-cell spray foam is the premier choice for basement wine storage because it provides superior thermal resistance and moisture protection. Industry standards recommend a minimum of R-19 for walls and R-30 for the ceiling. This material expands to fill every crevice, eliminating the "cold bridges" that often lead to condensation. If you use fiberglass batts instead, you must be extremely careful to install a separate 6-mil poly vapor barrier.
How do I prevent mold in my basement wine cellar?
Preventing mold requires the construction of a hermetically sealed envelope using a vapor barrier and moisture-resistant materials. When you're researching how to build a wine cellar in your basement, remember that mold thrives on organic materials like standard drywall or cheap pine. Using all-heart Redwood or Mahogany for your racks and moisture-resistant green board for walls prevents fungal growth. Maintaining a consistent 60-70% humidity level with a professional cooling unit also stops excess moisture from pooling.
Is a vapor barrier necessary if I use spray foam insulation?
A separate 6-mil poly vapor barrier is usually unnecessary if you use closed-cell spray foam insulation. This specific type of foam acts as both a high-efficiency insulator and a moisture block by creating its own airtight seal. However, if you choose fiberglass or rigid foam boards, a dedicated vapor barrier is mandatory. It must be installed on the "warm side" of the studs to prevent basement humidity from migrating into the chilled cellar environment.
How long does it take to build a custom wine cellar?
A custom project typically takes between four and twelve weeks from the initial design phase to final installation. The timeline depends on the complexity of the climate envelope construction and the lead times for specialized components like metal doors or custom-milled racking. Once the room is framed, insulated, and sealed, the physical installation of the racks and cooling system often takes less than a week. Allowing the room to stabilize for 48 hours is the final critical step.
What kind of door do I need for a climate-controlled wine room?
You need an exterior-grade or specialized metal wine cellar door equipped with a magnetic gasket and a thermal break. A standard interior door will leak chilled air and cause your cooling unit to fail prematurely. Professional doors often include an automatic bottom sweep to ensure an airtight threshold. This level of sealing is essential for how to build a wine cellar in your basement that maintains a stable 55-degree environment without constant energy waste.
Have an expert help today!
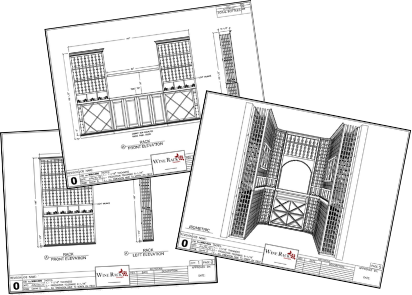
Free 2D wine cellar design